Night Riding: Essential Gear and Precautions
There’s something magical about cycling after dark. The tranquil streets, the cool breeze, and the serene beauty of the night sky offer a completely unique and thrilling experience. Familiar routes take on a new perspective, and the world seems calmer and more peaceful. But as enticing as night riding may be, it’s essential to be well-prepared and take the necessary precautions. Riding at night comes with its own set of challenges, particularly regarding visibility and safety.
Ready for an evening adventure on two wheels? Let’s gear up!
Contents
Understanding the Basics of Night Cycling
Daytime cycling and night riding are two different beasts. During the day, you have plenty of natural light, and obstacles on the road are easier to see. At night, reduced visibility can make it harder to spot potential hazards, and unpredictable road conditions can add to the challenge. Extra precautions are essential to ensure a safe and enjoyable ride.
Wondering what you need to do differently when cycling at night? Don’t worry, we’ve got you covered.
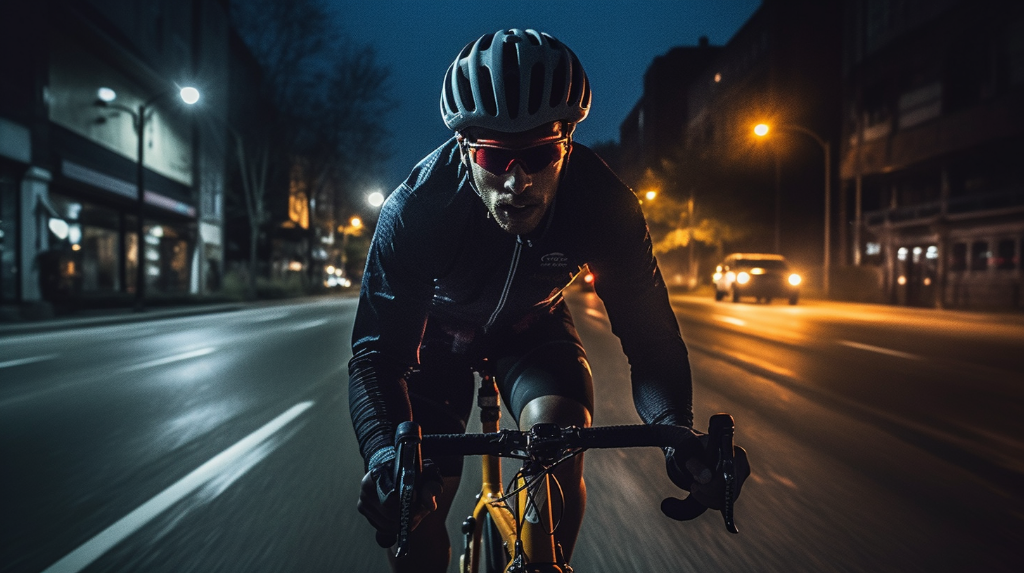
Essential Gear for Night Riding
Just like a superhero needs their suit, night cyclists need their gear. The right equipment will not only make your ride safer but also more enjoyable. And no, you don’t have to break the bank to get your hands on this gear. There are options available for every budget.
Curious about what gear you need for night riding? Stay tuned as we dive deeper into the essentials in the following section.
Illuminating the Path: Lights as a Priority
Have you ever tried navigating in the dark without a source of light? Quite challenging, isn’t it? When it comes to night cycling, lights are not just an accessory, they are an absolute necessity! A well-lit bike is crucial for two reasons: it allows you to see the path ahead and it makes you visible to other road users.
There are several types of bike lights available in the market, each with varying lumens, modes, and battery life. Lumens is a measure of the total amount of visible light emitted by a source, and in our case, more lumens equates to brighter light. Light modes usually include steady and flashing settings, each serving a specific purpose. While the steady mode is used to light up your path, the flashing mode is used to grab attention and signal your presence to others. And let’s not forget about battery life! Whether you prefer lights with rechargeable batteries or those that require regular battery changes, ensure that your lights have enough juice to last your entire ride.
Choosing the Right Light
So, how do you go about choosing the right light? Well, it all depends on where you’ll be cycling and how well-lit those areas are. If you’re traversing through well-lit streets, a light with lower lumens might suffice. But if your adventure takes you off-road or through poorly lit areas, you’ll need a light with higher lumens. Remember, your light should be bright enough to illuminate potential hazards on your path and visible enough to alert other road users of your presence.
There are also lights specifically designed for different parts of your bicycle. For instance, front lights are usually white and are brighter to illuminate the path ahead, while rear lights are red and used to signal your presence to those behind you. Don’t overlook the importance of side visibility too! Consider lights with a wide beam spread or add spoke lights to your wheels.
Proper Light Installation and Usage
Now that you have your lights, how do you use them effectively? First, ensure that they are correctly installed. Front lights should be mounted on the handlebar or the front fork, while rear lights should be attached to the seat post or the rear rack. Make sure the lights are firmly secured and aimed correctly – you wouldn’t want to blind oncoming traffic or waste your battery lighting up the sky, would you?
Remember, using your lights is just as important as having them. Always turn on your lights when visibility is low, not just when it’s dark. This includes times like dawn, dusk, and during inclement weather. And don’t forget to check your lights before you start your ride. It’s a simple step that could significantly increase your safety on the road.
The Visibility Trifecta: Reflective Gear, Hi-Vis Clothing, and Light-up Accessories
While lights play a significant role in visibility, they are only part of the equation. Enter reflective gear, hi-vis clothing, and light-up accessories! It’s like creating a visibility trifecta for your night rides.
Reflective gear works by bouncing back light to the source, making it highly effective when headlights hit it. This can include things like reflective vests, bands, and tapes that can be attached to both your bike and clothing. Hi-vis clothing, on the other hand, is designed to stand out against any background, making it easier for you to be spotted. This could be a bright neon jacket, helmet, or gloves.
And let’s not forget about light-up accessories! These fun additions can include things like illuminated backpacks, shoe clips, and helmet lights. Not only do they add an element of fun to your ride, but they also enhance your visibility. Remember, the goal is to be seen, and these accessories can significantly contribute to that.
Helmets and Protective Gear: Safety First
Lastly, we can’t talk about night riding without mentioning helmets and other protective gear. Helmets are a must, not just for night rides but for cycling in general. I mean, who would gamble with their safety, right? Apart from protecting your head in case of an accident, a helmet can also serve as an additional spot for mounting lights or a camera.
Consider also wearing protective gear like knee and elbow pads. They might not directly increase your visibility, but they provide an extra layer of safety, especially if you’re riding on unpredictable terrain. Remember, safety should never be compromised, no matter how experienced you are as a cyclist.
So, are you ready to conquer the night? With the right gear and precautions, night riding can be a thrilling and unforgettable experience. Stay safe, be seen, and enjoy the ride!
Navigating the Night: Planning Your Route
Have you ever thought about the importance of planning your route before embarking on a night ride? You should. It is an essential aspect of night cycling that should never be overlooked. Familiarity with the route you intend to take cannot be overemphasized. This allows you to anticipate turns, be aware of the road’s condition, and know where the street lights are and aren’t.
Furthermore, try as much as possible to avoid risky areas. These are places with high-speed traffic, poorly lit streets, or dangerous intersections. It’s always better to take a longer, safer route than a shorter, riskier one. Remember, the goal is not just to enjoy the ride, but to do so safely.
Weather Considerations: Adjusting to the Conditions
Just as important as planning your route is considering the weather. Weather conditions can significantly affect visibility and road conditions during night rides. For example, a rainy night can make the roads slippery and the visibility poor. On such nights, you might need to slow down, use your lights more, and wear waterproof gear.
On the other hand, a clear, starry night might require less light intensity but more warmth layers. Isn’t it fascinating how the weather can influence our night ride preparation? It’s always a good idea to check the weather forecast before heading out. That way, you can adjust your gear and tactics accordingly.
| Weather Condition | Visibility Level | Appropriate Gear Adjustment |
|---|---|---|
| Rainy | Poor | High-intensity lights, reflective and waterproof gear |
| Clear and Starry | Good | Lower light intensity, warm clothing |
| Foggy | Very Poor | High-intensity lights, reflective and bright-colored gear |
| Snowy | Poor | High-intensity lights, reflective, waterproof, and warm gear |
| Windy | Good | Regular light intensity, wind-resistant clothing |
Communication and Group Rides: Strength in Numbers
Another safety measure you can take when cycling at night is riding in a group. There’s strength in numbers, right? Group rides can increase your visibility to other road users. Plus, it’s always more fun to share the experience with friends.
But don’t forget, communication is key in a group ride. Make sure everyone understands the route, the pace, and the signals for stopping, turning, or alerting of hazards. This way, everyone stays safe and has a great time.
Going Beyond Gear: Defensive Riding Techniques
Have you ever thought about how your riding technique can contribute to your safety, especially during night rides? Well, it’s not just about the gear; it’s also about how you use it. Defensive riding is a proactive approach that can significantly increase your safety on the road. It involves anticipation, positioning, and communication.
Anticipation involves being aware of your surroundings and expecting the unexpected. It means always being ready for potential changes in road conditions or sudden moves by motorists. Sounds challenging, right? But with practice, it can become second nature.
Positioning is all about where you place yourself on the road. The key is to be visible while also giving yourself the best view of the road ahead. This might mean taking the full lane when necessary or positioning yourself where you can be easily seen by drivers.
Lastly, communication is crucial. This doesn’t mean having a chat with every motorist you meet. Instead, it’s about using signals to indicate your intentions. It’s simple, but it can make a world of difference.
Essential Maintenance for Night Rides
You wouldn’t hop into a car without checking it’s in working order, right? The same applies to your bicycle, especially when you’re heading out for a night ride. Regular maintenance checks are crucial to ensure your bike is in top shape and safe to ride. Pay particular attention to your brakes, tires, and lights.
Brakes are your primary safety feature, so they need to be in perfect working order. Check for worn brake pads and ensure the cables aren’t frayed or damaged. Your tires should be properly inflated, and check for any cuts or embedded debris that could cause a puncture. And of course, always test your lights before setting off – a dim or non-functioning light can be a serious safety hazard.
Here’s a handy checklist to guide you:
- Brakes: Check for worn brake pads and inspect cables.
- Tires: Check for proper inflation and inspect for cuts or debris.
- Lights: Test all lights to ensure they are functioning correctly.
Final Thoughts: Balancing the Excitement and Safety of Night Rides
So, we’ve covered a lot, haven’t we? Night rides can offer a unique thrill and a fresh perspective on familiar routes. But as we’ve discussed, they also require extra preparation and precautions. From the essential gear to defensive riding techniques and pre-ride checks, there’s a lot to consider.
Remember, the thrill of night riding should never compromise your safety. Always prioritize being seen and stay alert to your surroundings. Equip yourself with the right gear, follow our tips, and you’ll be well on your way to safe and enjoyable night rides. Ready to take on the night?